
ILLUSTRATED GUIDE · v11 · 2026-11-03
From installation to the
final business audit report
Mac · Windows · Linux
10 steps with actual product screens
Administrator computer → designated VM → AI and data connections → PackrGUI workflows → final report in the existing audit format
Mac ARM64 · v07Windows x86_64 · v09Debian 13 x86_64 · v07Guide v11 · English default / EN–KR switch · verified installers unchanged
STEP 01
Check the package and your OS
Follow this route: administrator computer → existing Debian 13 VM → data connections → business workflows → final audit report. The administrator prepares the GCP VPC and VM, or the local VM, beforehand. Start-Setup installs on the existing server you specify.
Extract the ZIP into a new folder and open this top-level guide first. Check the source, CPU architecture, release and SHA-256. Preserve your previous installation and private connection files. A matching hash does not replace official signing or notarization.
| Administrator OS | Verified installer | Recorded test scope |
|---|---|---|
| macos | VibePackr-Client-2026.11.03-v07-macos-arm64.dmg | 369 installed files compared · GUI workflow · A4 report · Codex status query |
| windows | VibePackr-Client-2026.11.03-v09-windows-amd64.msi | 362 installed files compared · GUI workflow · A4 report · Codex status query |
| linux | VibePackr-Client-2026.11.03-v07-debian13-amd64.deb | 364 installed files compared · GUI workflow · A4 report · Codex status query |
The verified platforms are Apple Silicon Mac (ARM64), Windows x86_64 and Debian 13 x86_64. Intel Mac, Windows ARM and other Linux distributions were not covered.
Match the installer and SHA-256 to your OS and CPU. The guide is v11; the verified installers remain Mac/Linux v07 and Windows v09.
STEP 02
Install and open the client on each OS
| OS | Installation steps | Required environment |
|---|---|---|
| macOS | Open the DMG → copy the entire VibePackr Client folder to your approved user location → eject the DMG → open Open Manual.command and Apps/PackrGUI/Packr.app from the copied folder. | Apple Silicon. Keep the complete folder structure. If Gatekeeper blocks the app, retain the error, verify the source and use an organization-approved distribution. |
| Windows | Install the MSI as the logged-in desktop user → open VibePackr Manual and Packr from the Start menu → verify the v09 installation path. | WebView2, OpenSSH Client and Windows tar. The user-profile path is used when HOME is absent. Follow your organization’s administrator procedure for a system-wide installation. |
| Debian 13 | Install the DEB through the approved package manager → open VibePackr Manual and Packr from the application menu → check the version under /opt/vibepackr-client. | The GTK/WebKit libraries declared by the package and a graphical login session. An SSH terminal alone does not verify the GUI. |
Preserve the relative paths of Apps, bin, Manuals, agent-integration and Workflow. Prepare OS runtime libraries in advance for an offline installation. Optional Rust/SDK dependency bundles do not replace WebView2, GTK or WebKit.
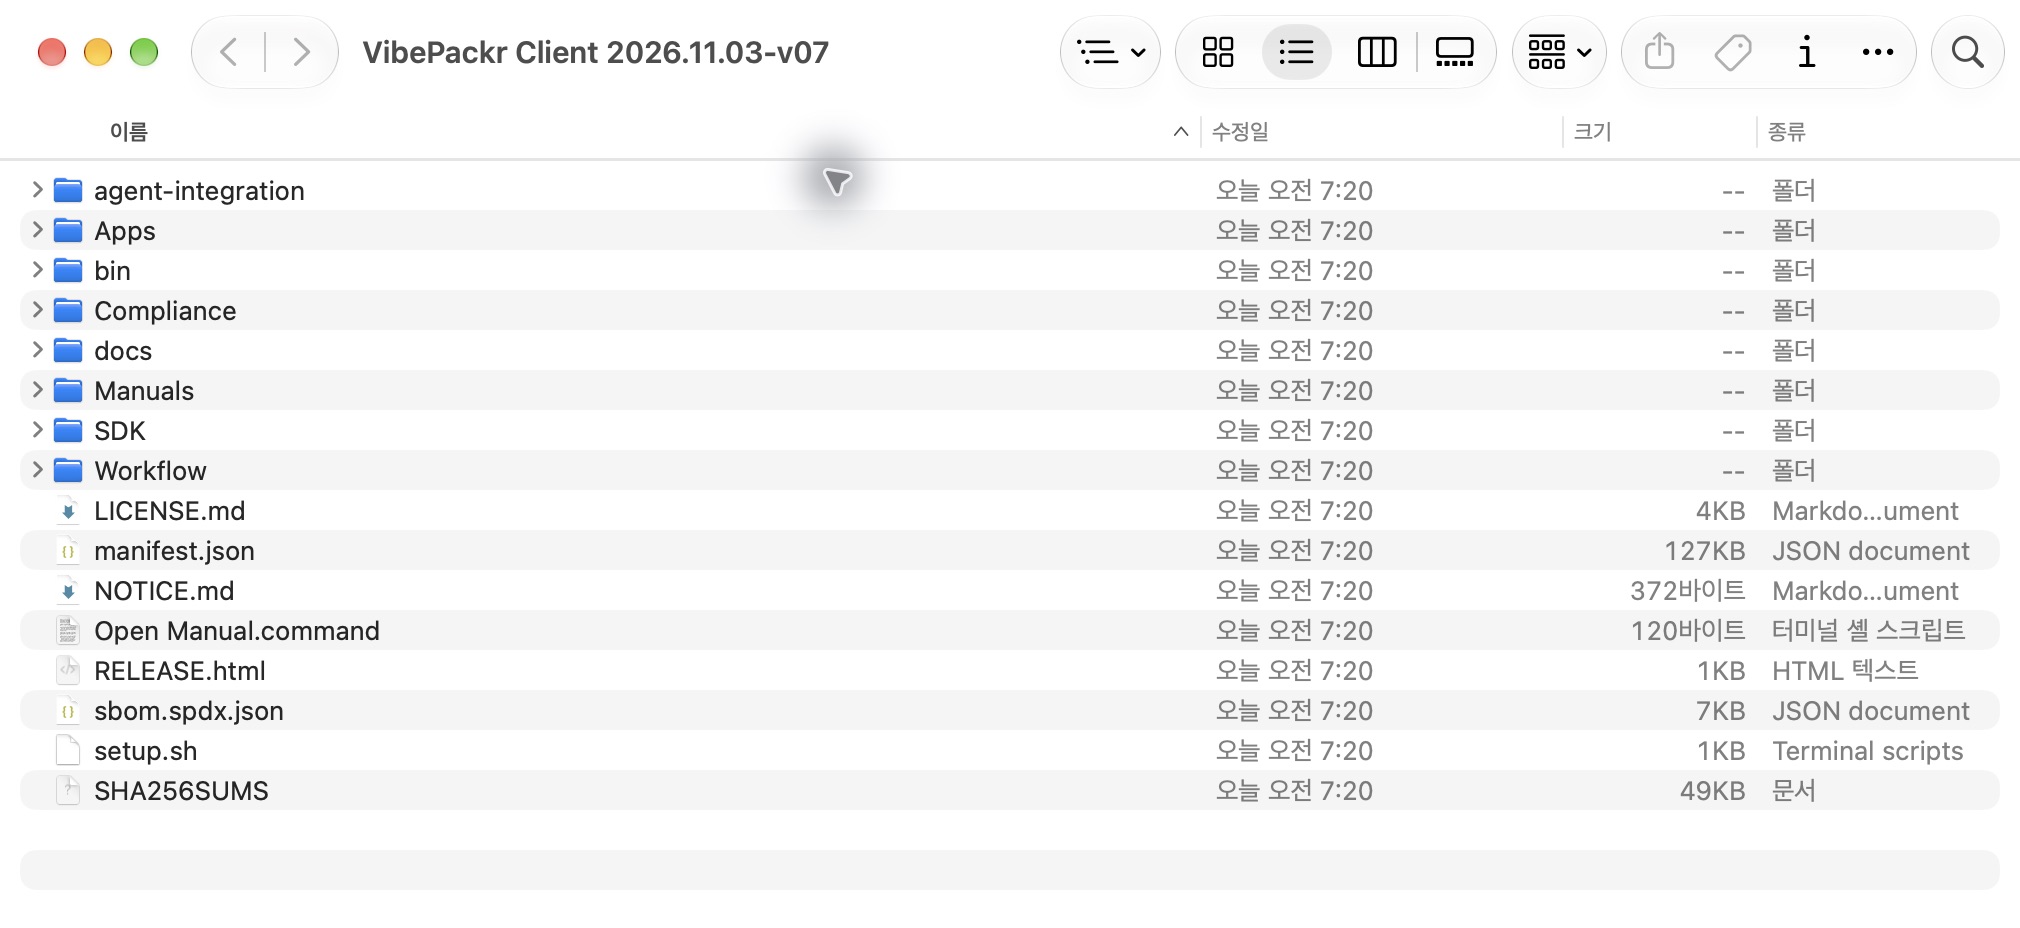
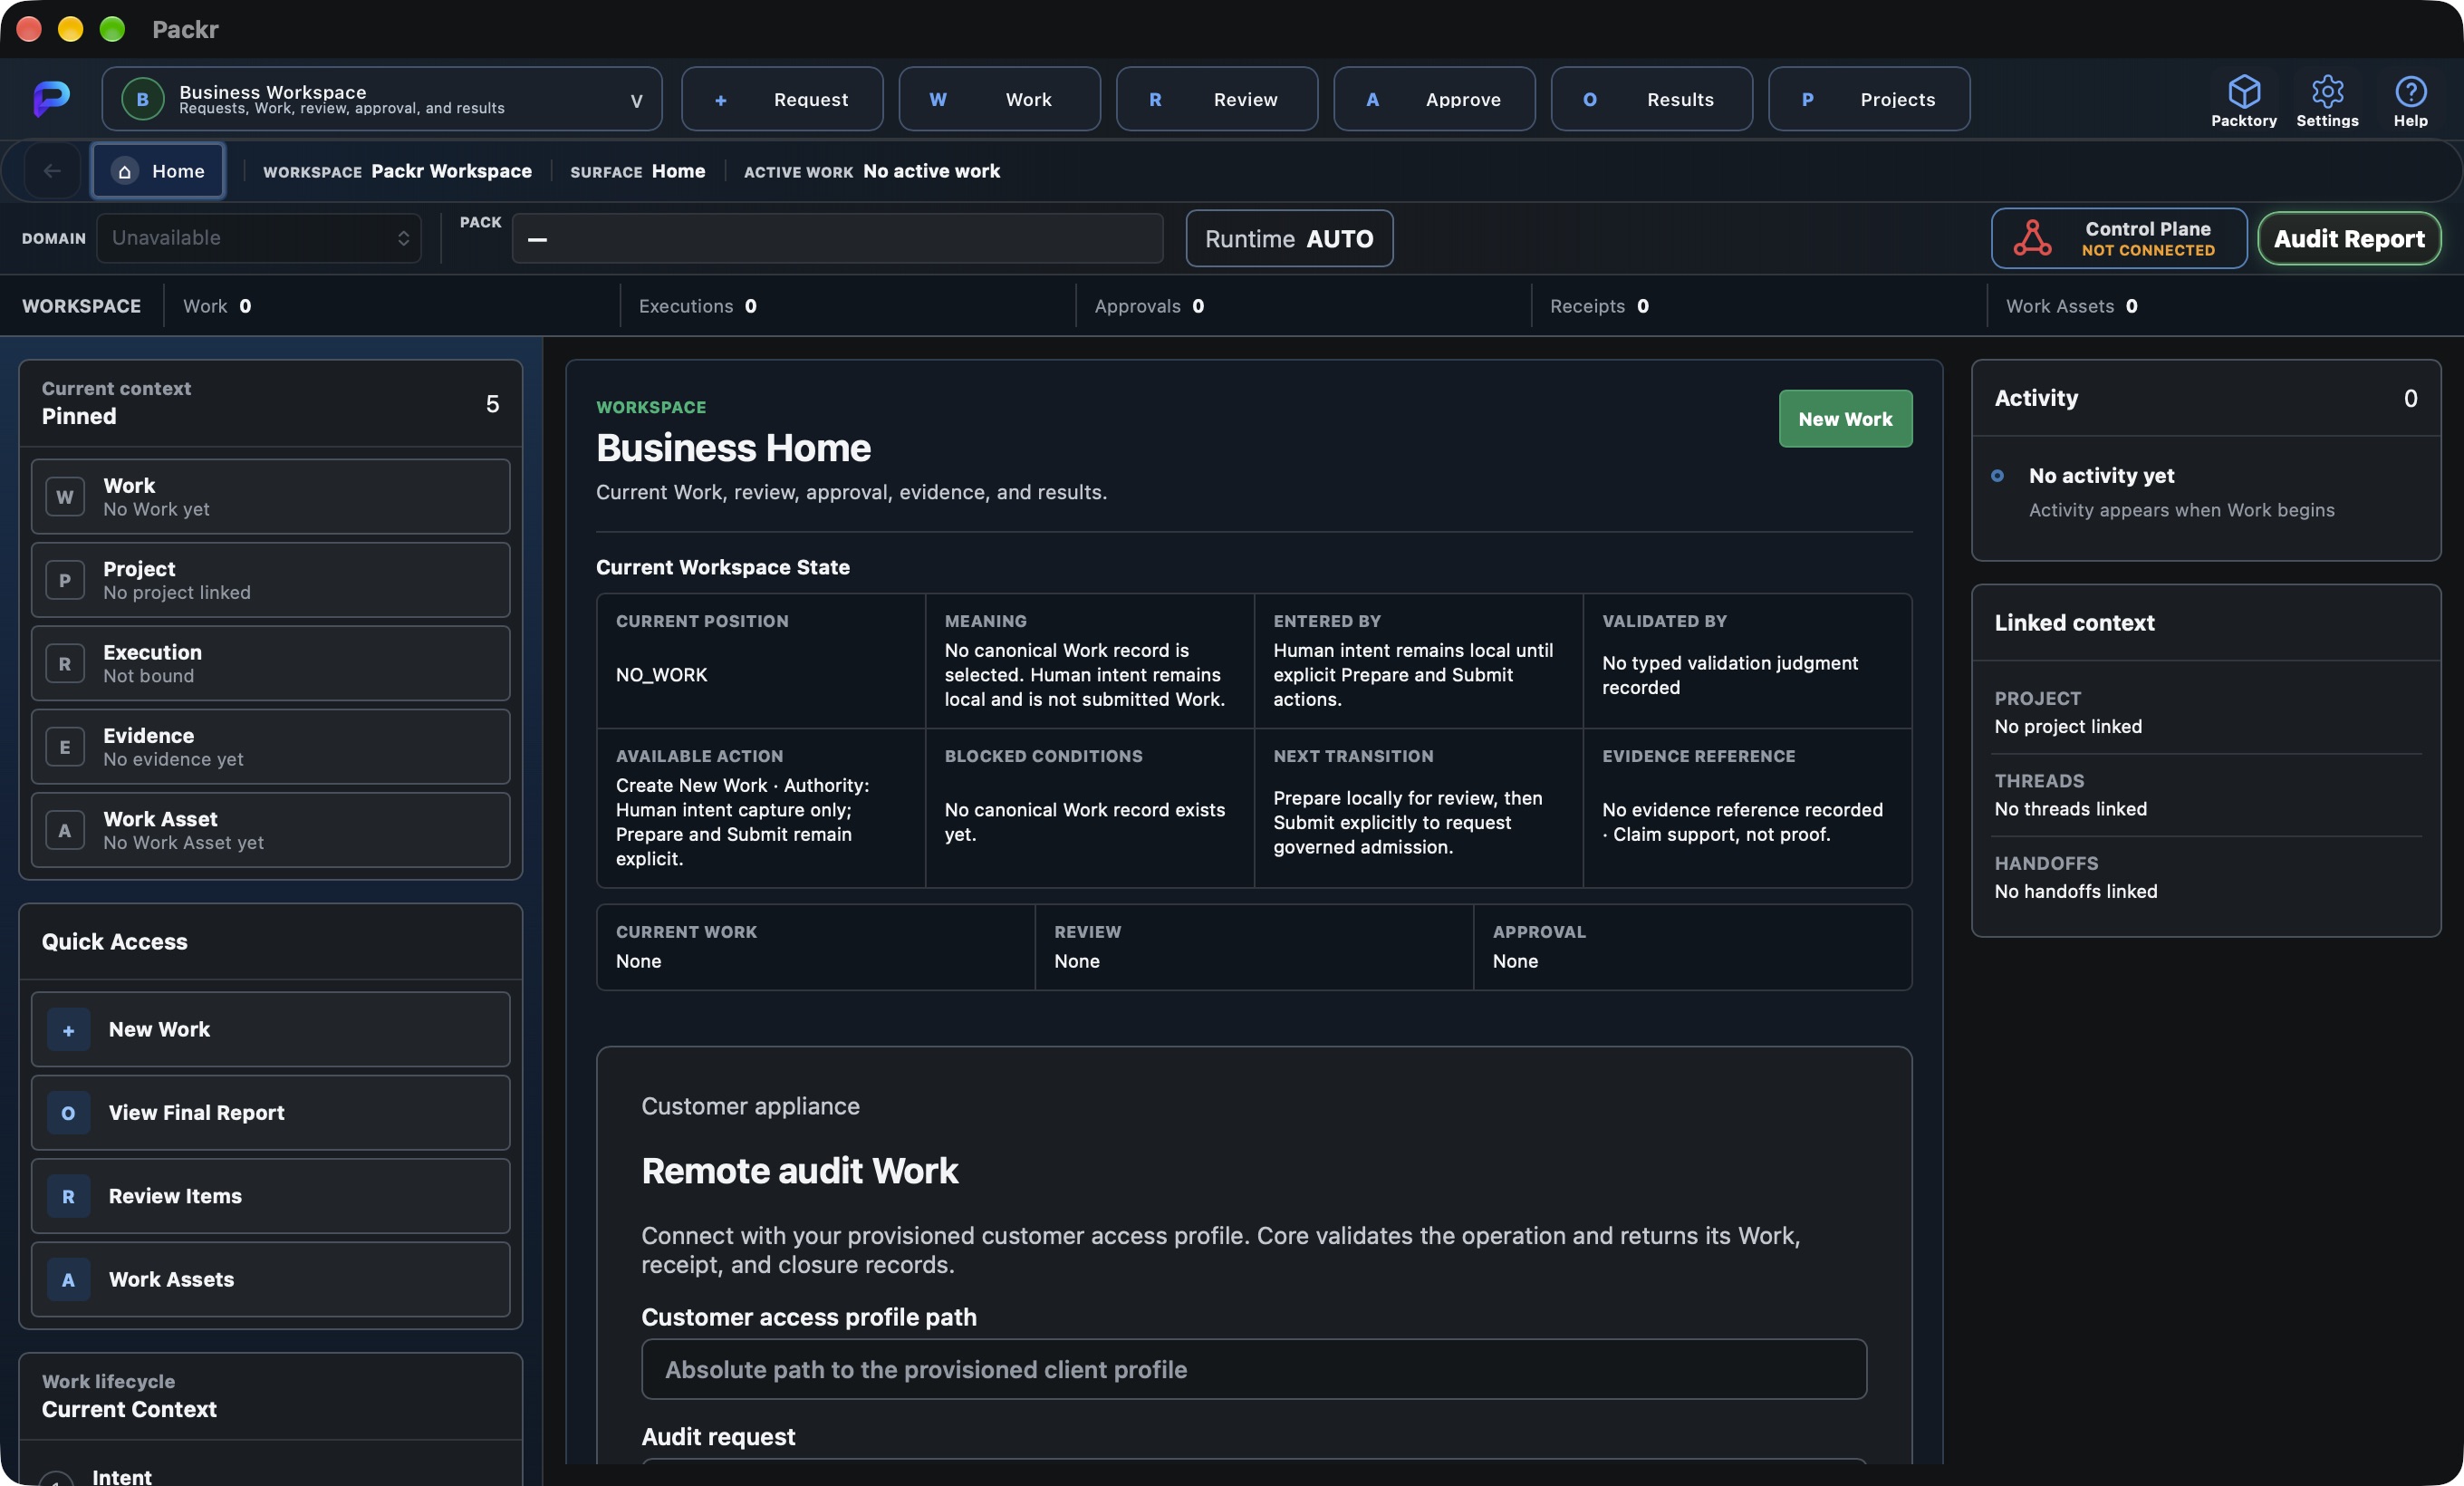
Open PackrGUI from the installed version and confirm that the English Home UI is readable. Not connected and No work are expected before connecting.
STEP 03
Select the VM and enter connection details
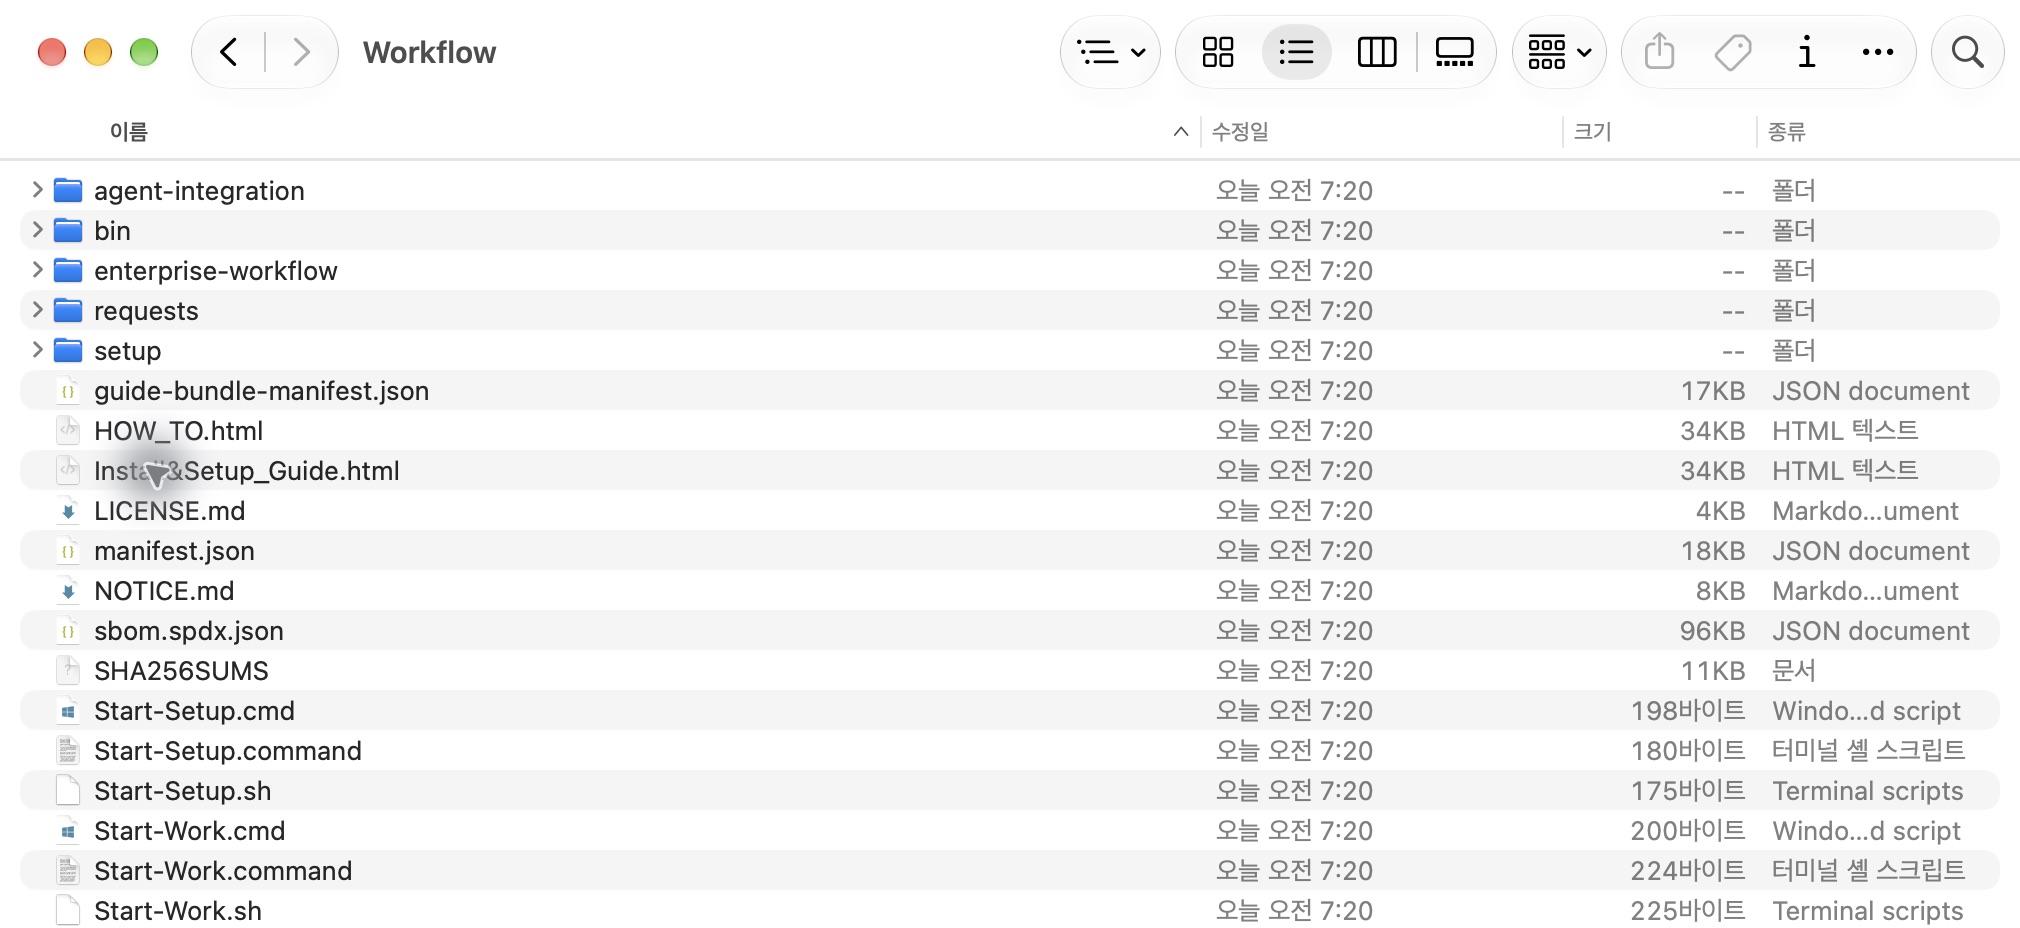
Open the launcher for your OS from the ZIP’s Workflow folder. Opening the HTML file alone does not start the connection and installation helper.
| OS | Start installation | Run workflows |
|---|---|---|
| Mac | Workflow/Start-Setup.command | Workflow/Start-Work.command |
| Windows | Workflow\Start-Setup.cmd | Workflow\Start-Work.cmd |
| Linux | Workflow/Start-Setup.sh | Workflow/Start-Work.sh |
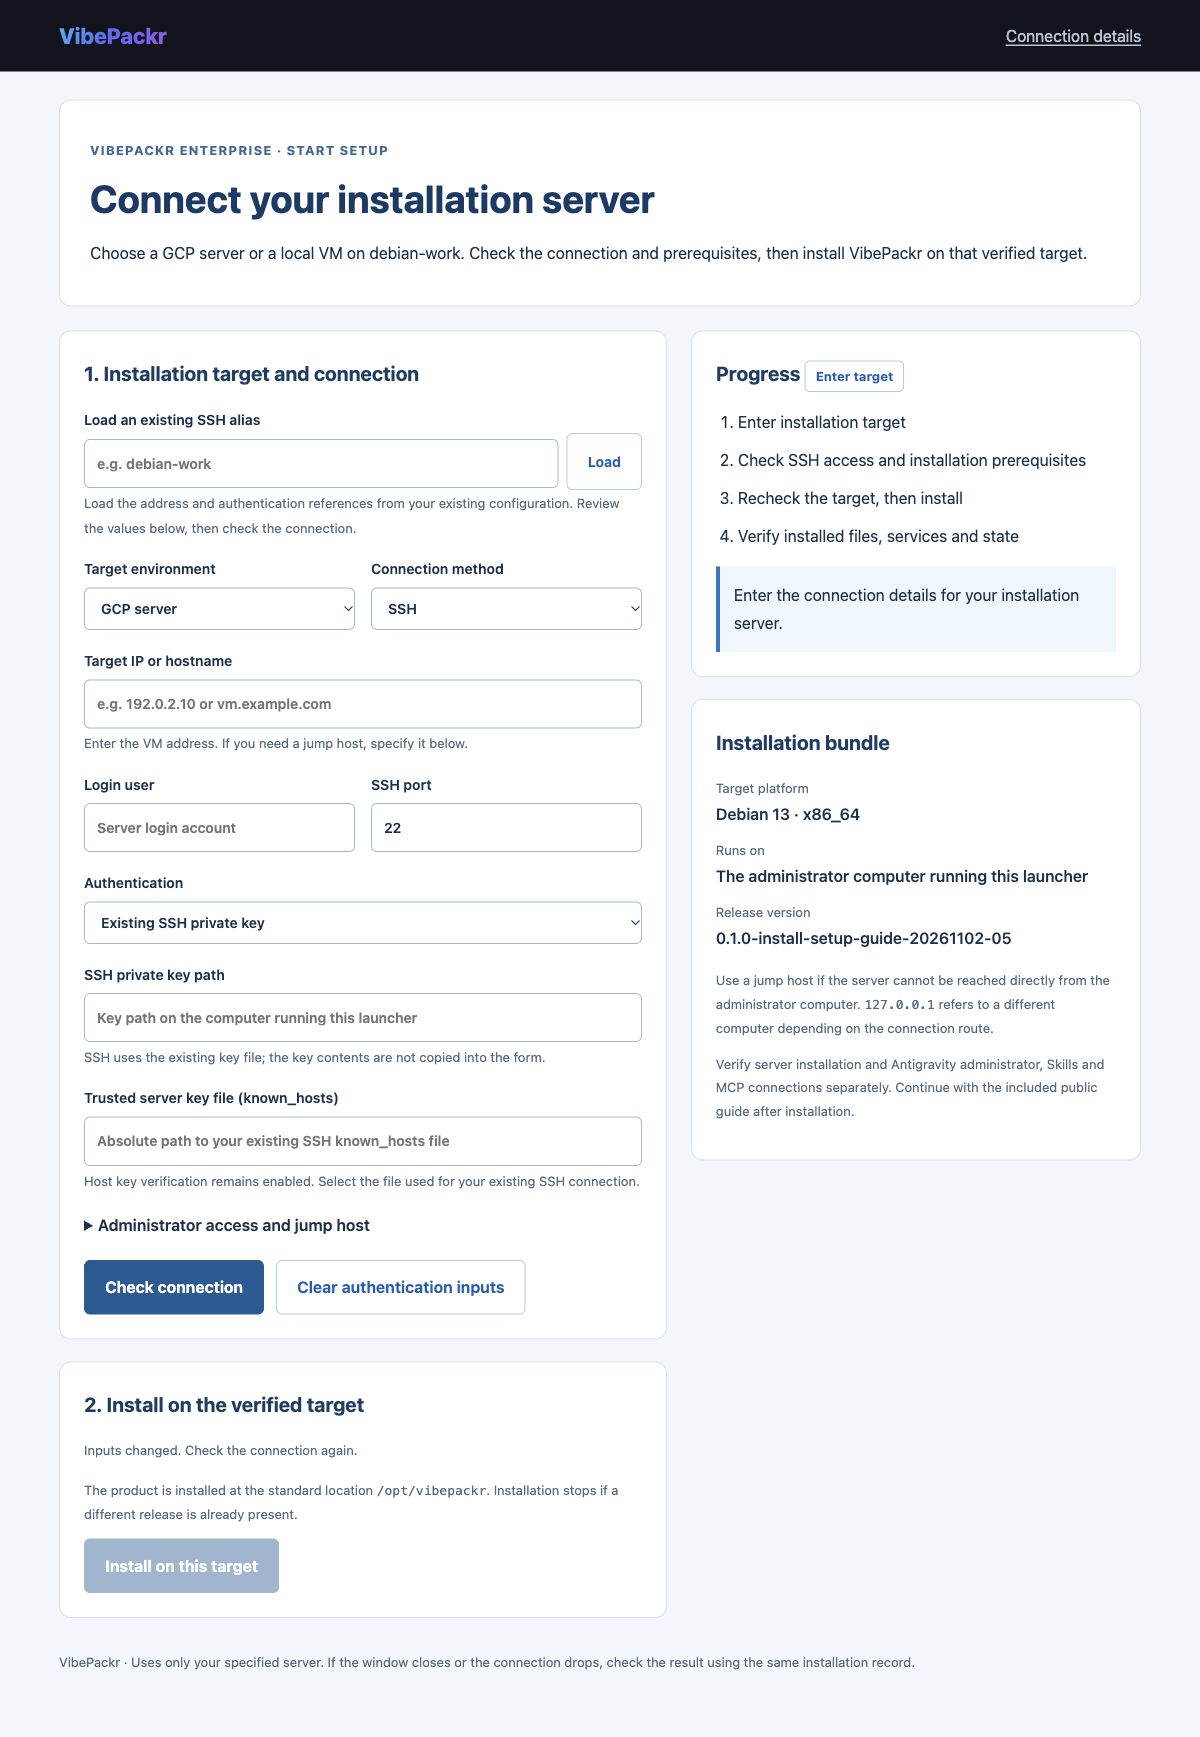
- Select GCP server or the local VM option in Target environment.
- Enter the target address, SSH port, login user and authentication method. Loading an existing SSH alias is an optional input aid: you choose the alias and click Load, then review the loaded values.
- Select the SSH key file and the trusted server-key file. Use paths on the administrator computer running the launcher.
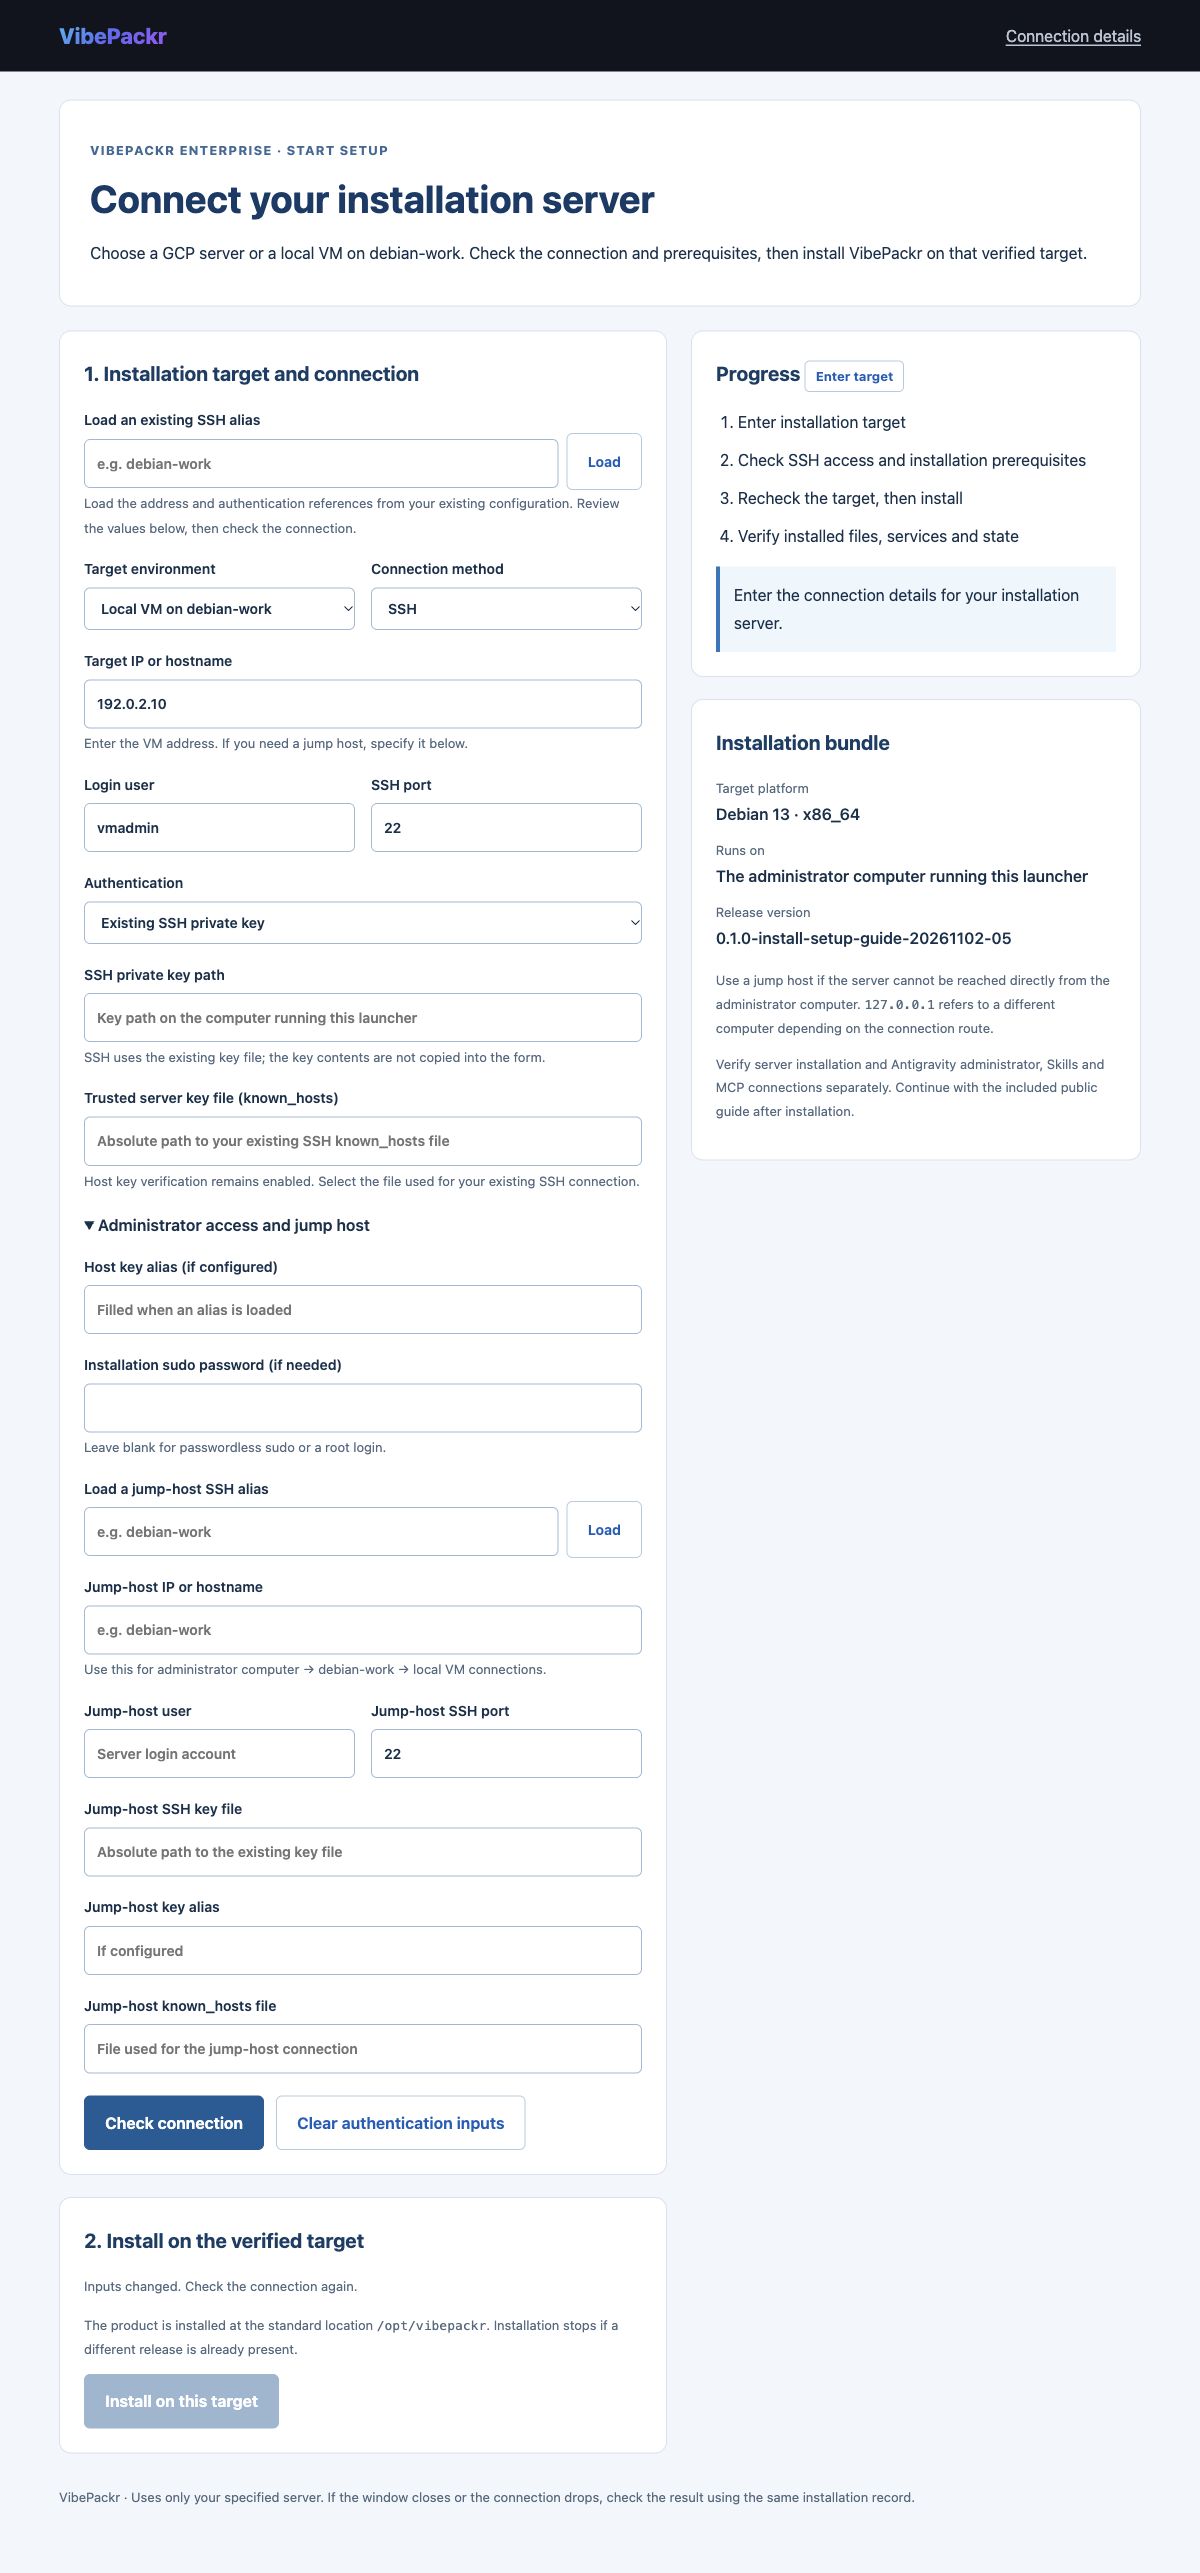
| Target | Connection route | Identity to verify |
|---|---|---|
| GCP | An existing VM in the designated VPC. Without an external IP, enter the local address and port of an administrator-prepared IAP/SSH tunnel. | Project, zone, instance, VM ID and the original server’s SSH host key. |
| Local VM on debian-work | The VM address or existing SSH alias reachable from the administrator computer. Configure a jump host when needed. | VM hostname, OS, architecture, machine identity and SSH host key. |
Windows difference: direct jump-host execution is not supported. Prepare the SSH/IAP tunnel first, then enter its local address and port and the original server-key alias. Mac and Linux also require a working network route and authentication.
Confirm that the connection reaches the server you intend to install. Do not reuse the sample address, username or port as real connection values.
STEP 04
Check the connection, confirm the target, then install
- Click Check connection to verify SSH access and installation prerequisites.
- Review the returned target identity, Debian 13 x86_64 platform and installation permissions. Selecting a VPC does not create a VM.
- Install on the verified target, then confirm Installation verified, service state and health checks.
- Save the installation result. The product uses /opt/vibepackr, /etc/vibepackr and /var/lib/vibepackr; this flow does not accept an arbitrary installation directory.
The earlier GCP installation measurements remain in the verification records. This documentation update did not reinstall a VM or change cloud resources. If installation is interrupted, check the retained record before trying again. Do not repeat an uncertain installation as a new operation. See the installation helper guide for detailed input and recovery steps.
The target identity, installed files, service state and health checks must all match. An open setup screen alone is not proof of installation.
STEP 05
Connect the AI host, Skills and MCP
- Follow the server administrator guide to prepare the initial owner and customer connection. Adding another model or legacy system does not require reinstalling the server.
- Use the release adapter for the OS where the AI agent actually runs. An agent running inside the VM uses the VM adapter.
- Preserve existing AI settings and register the descriptor generated from your private configuration. Use the agent setup reference and MCP setup reference.
- Check initialize → tools/list → setup.status. The public catalog for the applicable OS release contains 18 tools. A host allowlist can limit which tools are exposed.
Previous live-host tests verified one status-query tool and 11 Skill metadata entries in Codex on Mac, Windows and Linux. They did not verify all 18 tools, a model reading Skill bodies, a live Antigravity connection or customer-environment binding. A local stdio adapter does not automatically create a remote VM tunnel.
An older embedded document may list 13 tools. That is a historical version. Use the current release catalog, OS and adapter hash for the connection you are checking.
Verify a real response in the AI host you will use. Record registration, business execution and model usage as separate scopes.
STEP 06
Prepare data access and audit connections
Use the existing Request → Existing data-mart workflow in PackrGUI. Business data access and the audit connection are separate inputs. Keep the existing product workflow form.
| Input | Purpose |
|---|---|
| Audit connection | For authenticated Headless on the installation server, select your private mTLS connection profile. For Headless on this computer, verify its existing service account, socket and authentication requirements. |
| Data connection | Nine authenticated APIs: connect remote ports 9081–9089 for ERP, CRM, SCM, SRM, PIM, PLM, DAM, OMS and WMS to consecutive local ports. Specify the private data-access file path. |
| Existing single API | UNIFIED_TEST_MARKETS_V1 uses remote port 9081 and a product ID; the access file is null. Missing credit/receivables fields produce BLOCKED_DATA_MISSING and STOP_WITH_FINDING. |
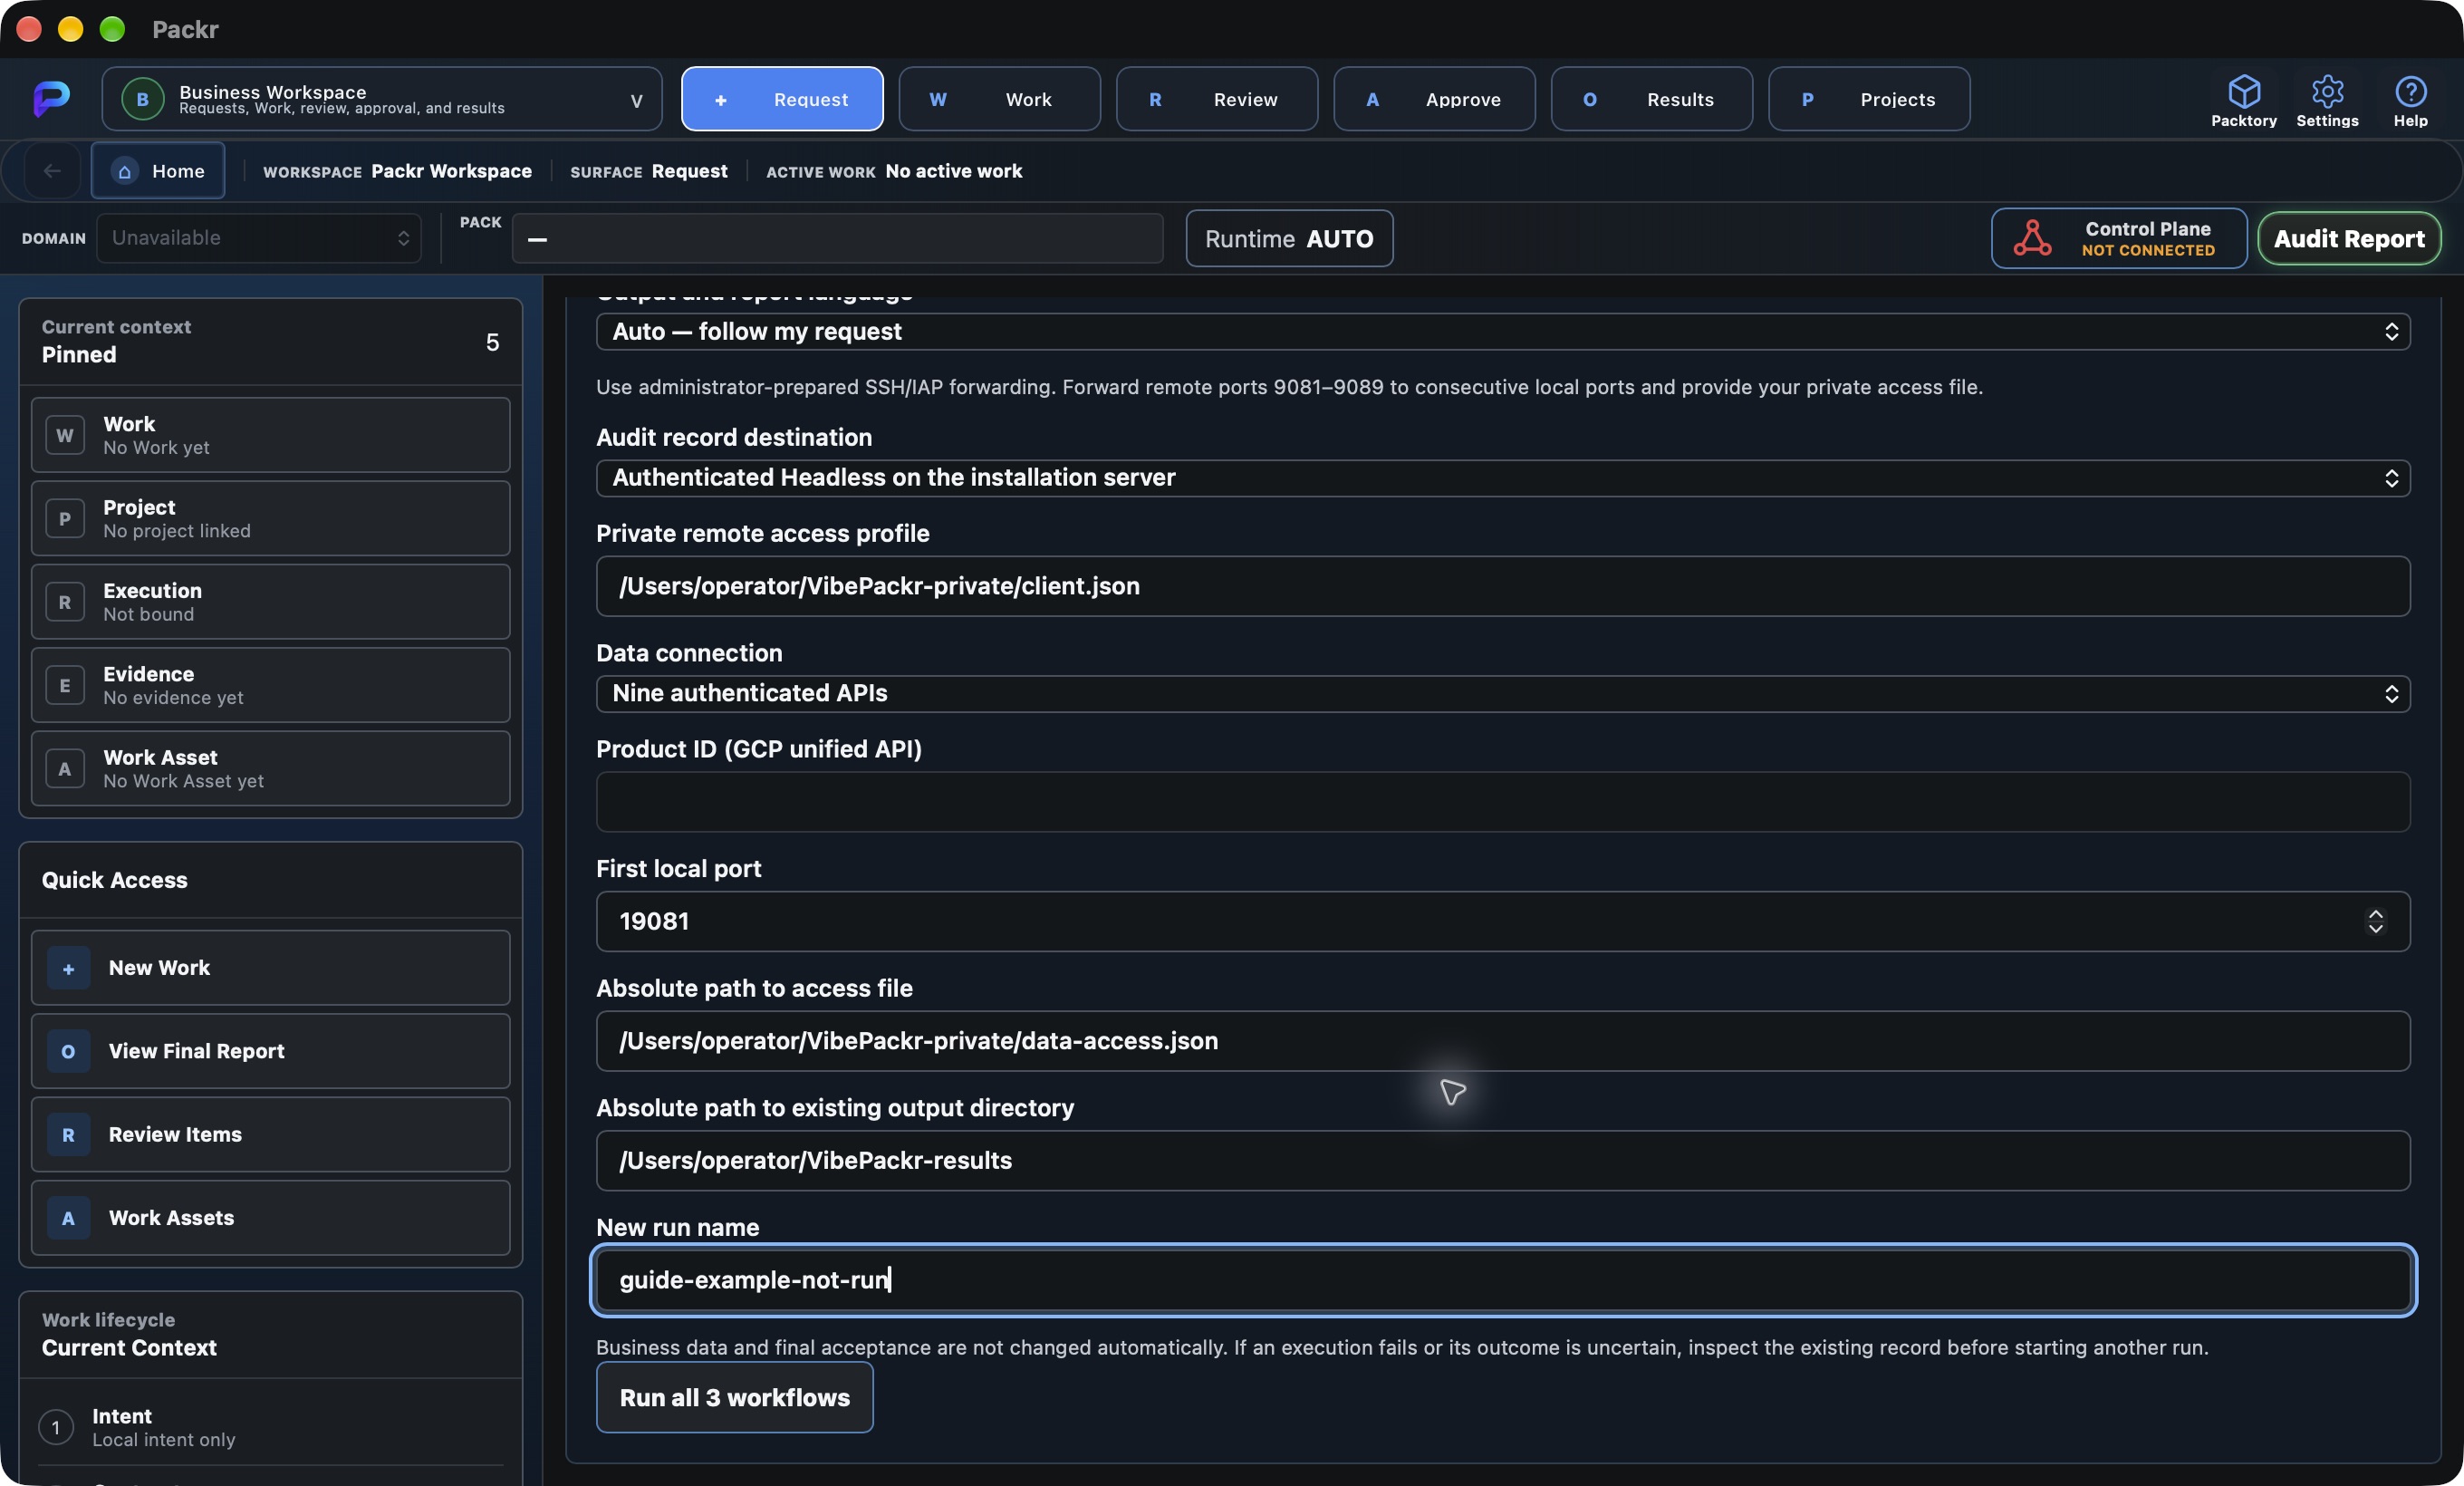
| OS | Example private path | Permissions and differences |
|---|---|---|
| Mac | /Users/operator/VibePackr-private/client.json | Use a private file readable only by your account. Keep personal results separate from the installation folder. |
| Windows | C:\Users\operator\VibePackr-private\client.json | Verify ownership and disabled inheritance so only the current user and SYSTEM have access. USERPROFILE can supply the user path when HOME is absent. |
| Linux | /home/operator/VibePackr-private/client.json | Use a private file readable only by your account. The GUI user, SSH user and service account may differ. |
These paths are examples. Enter file references, not password or token contents. Keep certificates and private keys out of the installation package and report. Testing the existing synthetic nine-API format does not establish a live production ERP integration.
Confirm the organization and server in the audit profile, the API mode and ports, private-file permissions and the results folder.
STEP 07
Review the request and language, then run all three workflows
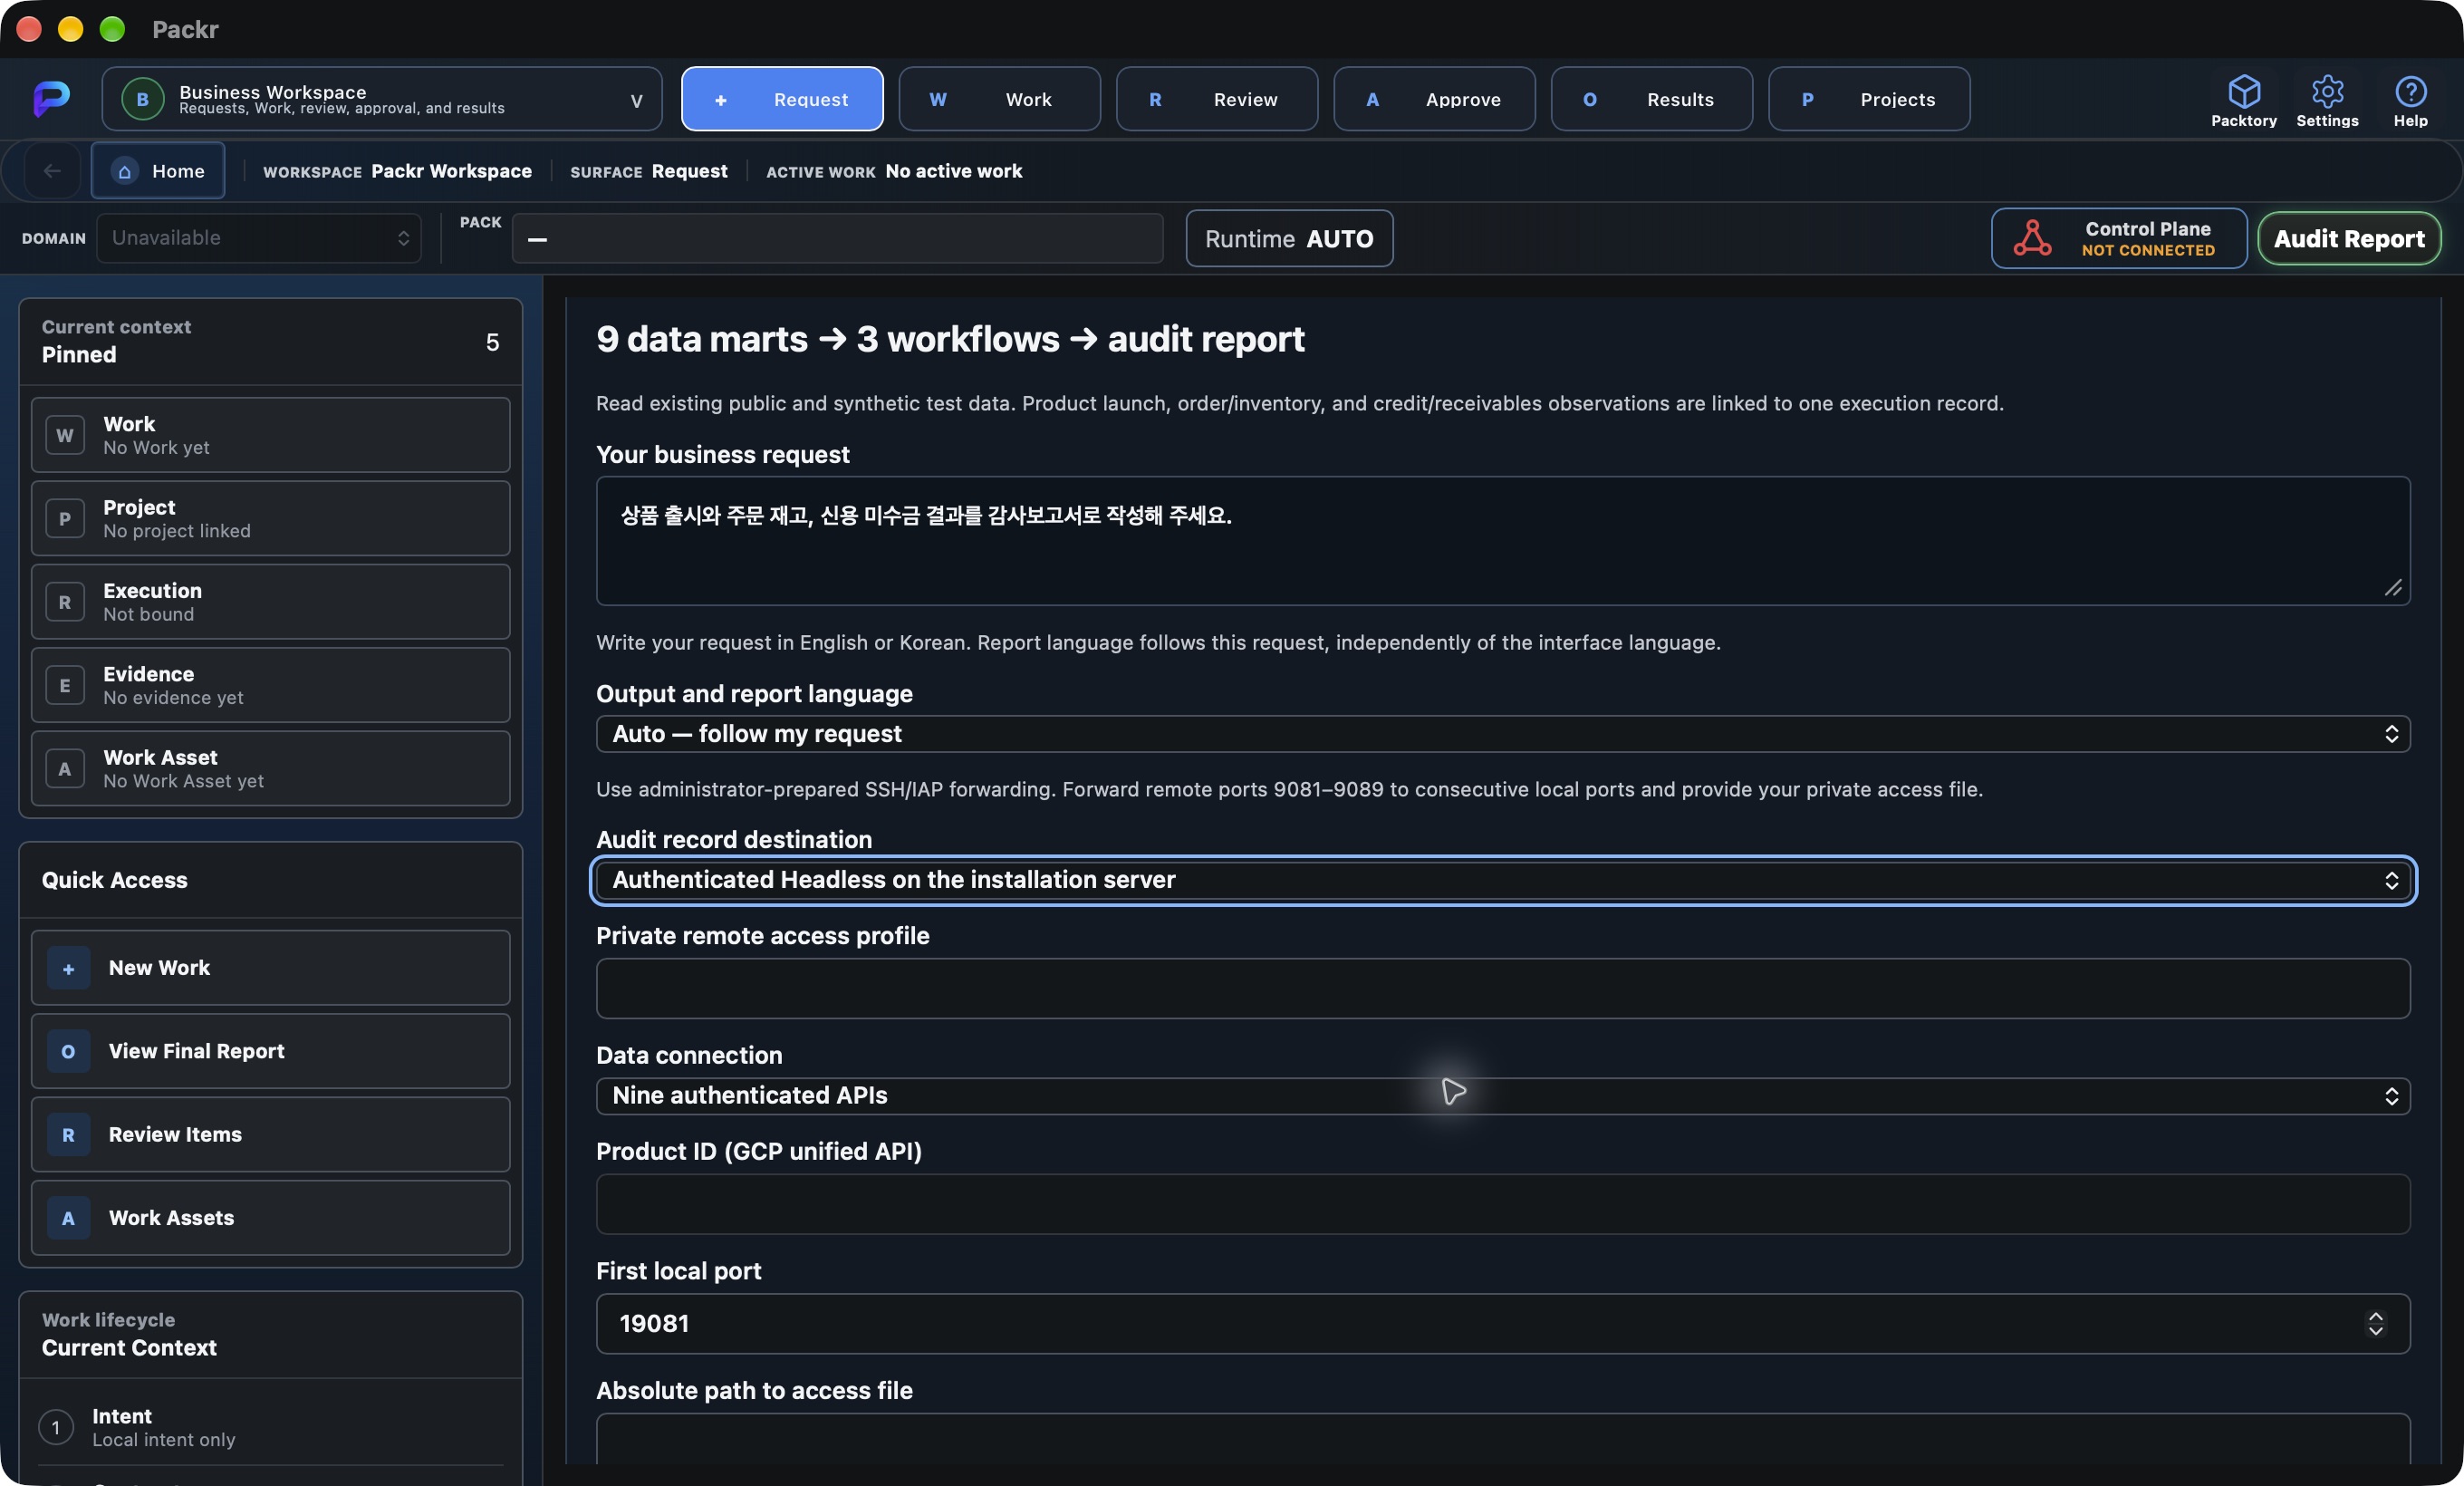
- Enter your business request, for example: “Write an audit report covering product launch, orders and inventory, and credit and receivables.”
- Select Auto, English or Korean under Output and report language. Auto determines the language from the request using the current EN/KO rules. Choose explicitly if the request is mixed or unclear.
- Check the audit connection, data mode, consecutive ports, private file references, results folder and a new run name.
- Click Run all 3 workflows to run product launch, order/inventory and credit/receivables together. If a results folder already exists for the run name, inspect its existing result first.
The product UI defaults to English. Outputs follow the request language or your explicit output-language choice, independently of the OS, guide language or source-data language. Quotes, proper names, status codes and original responsibility notices are preserved. Automatic language selection does not make an additional model call.
For Headless operation, use the Workflow/Start-Work launcher listed in step 3. Automation can use a private UTF-8 request file. These commands run from the Workflow folder; replace the variables with actual absolute paths.
./bin/macos-arm64/packr-enterprise-guide --bundle "$GUIDE_DIRECTORY" --remote-config "$PRIVATE_ACCESS_PROFILE" < "$REQUEST_FILE"

# Windows PowerShell
& "$GuideDirectory\bin\windows-x86_64\packr-enterprise-guide.exe" --bundle "$GuideDirectory" --remote-config "$PrivateAccessProfile" --request-file "$PrivateRequestFile"
On Linux, use bin/linux-x86_64. For an existing local Headless service, use --socket with the verified socket path instead of --remote-config. Keep the existing service authentication policy. See the historical detailed reference (Korean) for further examples.
Review the request, language, target and run name before executing once. The input screenshots in this guide are not completed execution results.
STEP 08
Open the final audit report for the same Work
Use PackrGUI’s existing results and audit-report controls to open the PDF for the same Work. Product, order/inventory and credit/receivables results appear in Business Results within the existing PackrGUI A4 report format.
- Match the Work ID in the result to the Work ID on the first PDF page.
- Compare final-report.pdf with final-report.json or the report reference in canonical-report-reference.json.
- Review business results, source-data links, receipts, closure records, missing-data findings and pending human acceptance together.
| OS | Verified report | How the file opens |
|---|---|---|
| Mac v07 | Korean request → Korean 15-page A4 v3 report | Uses the associated PDF application; Preview was used in the test. |
| Windows v09 | English request → English 15-page A4 v3 report | Uses the default PDF app or browser. Check both OS acceptance of the open request and actual file display. |
| Linux v07 | English request → English 15-page A4 v3 report | Uses the PDF application associated with the graphical session. GUI testing used debian-work; DEB installation was tested on a separate VM. |
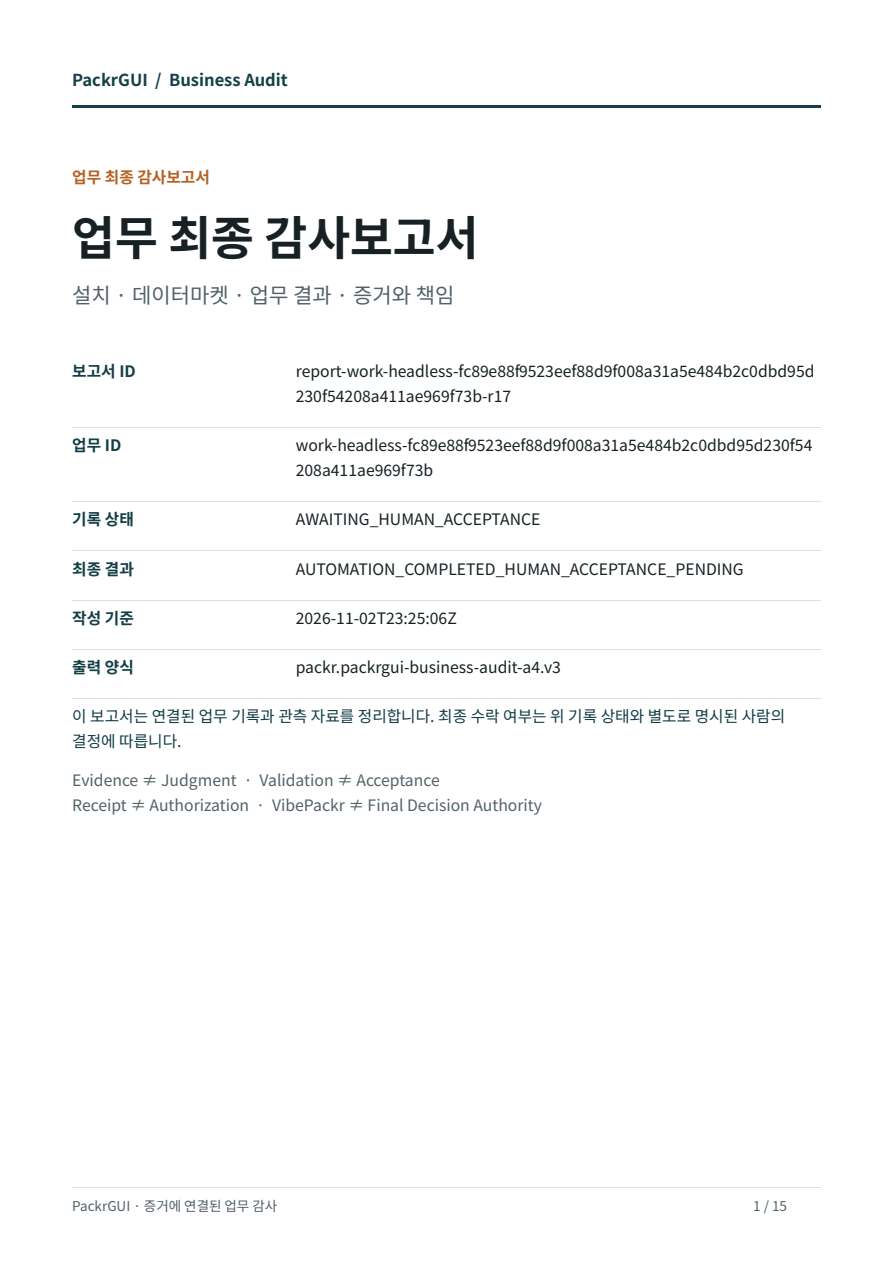
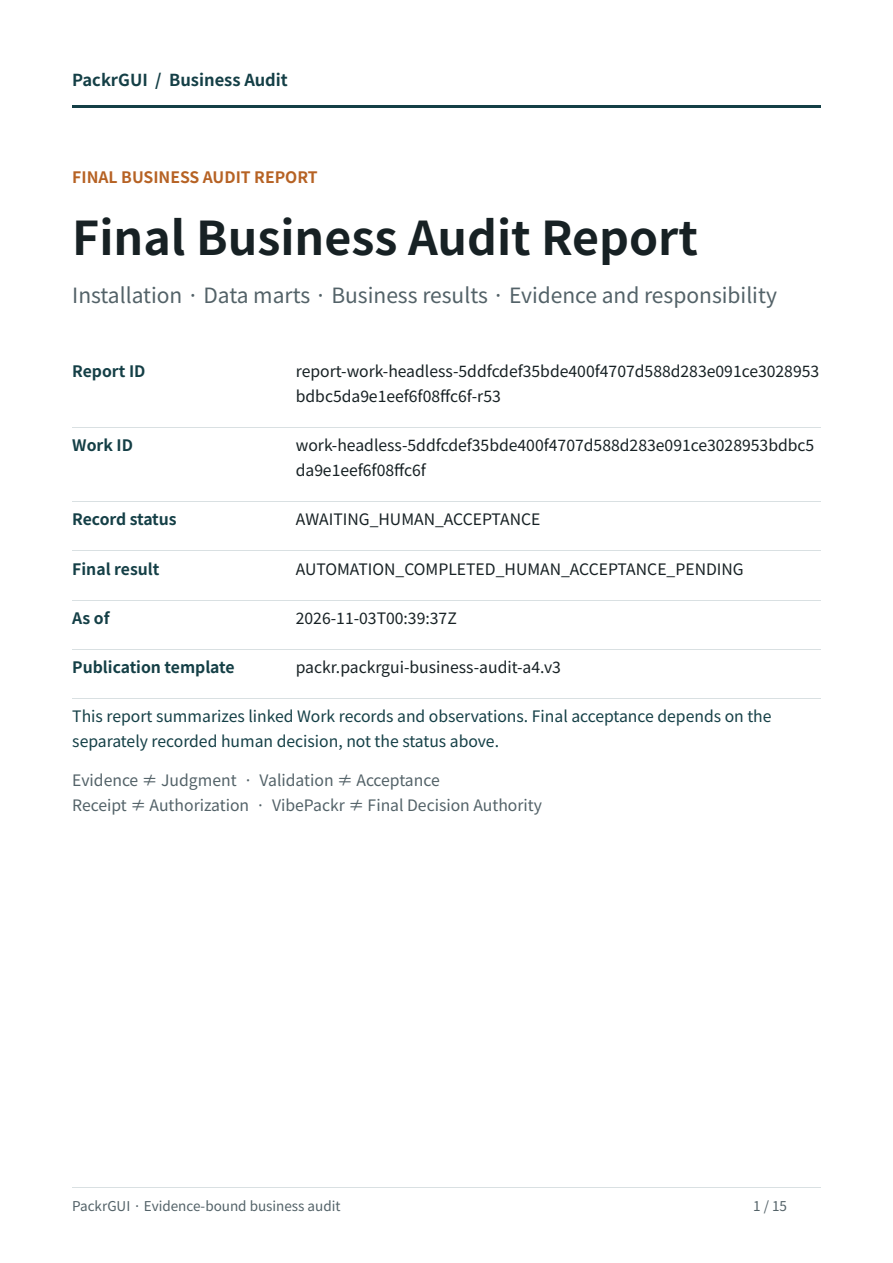
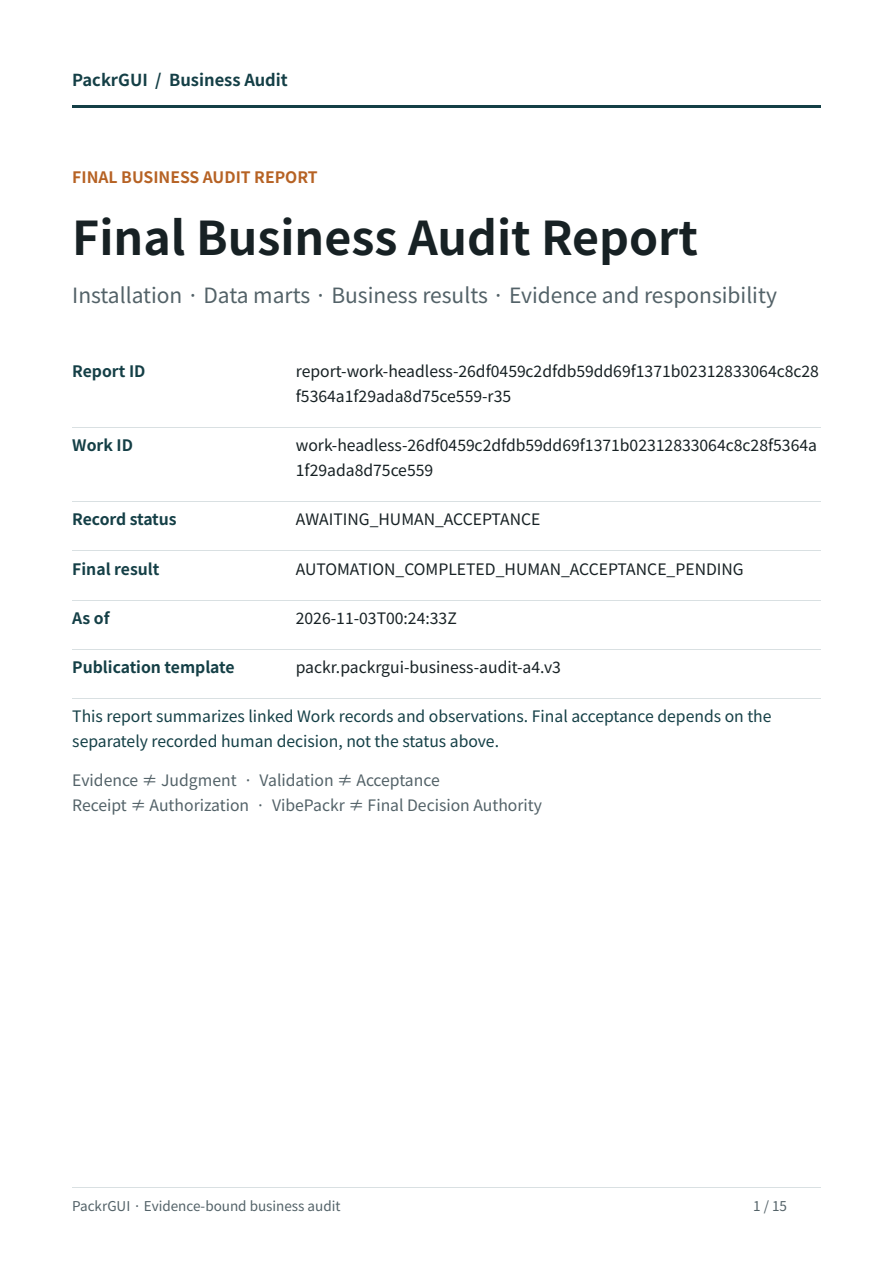
The three OS reports use the same template but belong to different test Works. These images are original PDF pages. See the three-OS verification record for Work IDs and PDF SHA-256 values.
Confirm the same Work, intended language and report template in the PDF and JSON. AWAITING_HUMAN_ACCEPTANCE means human acceptance is still pending.
STEP 09
Check product, inventory and credit results
The three-OS tests used the existing nine synthetic data marts and produced these values. For actual customer work, separately verify source meaning, units and timestamps.
| Workflow | Observed value | How to read it |
|---|---|---|
| Product launch | Gross margin KRW 58,000 | 89,000 − 31,000. Also check merchandising state, colors and approved assets. |
| Order and inventory | 30 sellable units | 180 physical − 110 reserved − 40 safety. The 12 quarantined units are reported separately; do not silently subtract them twice. |
| Credit and receivables | 95% limit utilization | 285,000,000 / 300,000,000. 9,500 basis points = 95%. Existing credit holds are not automatically released. |
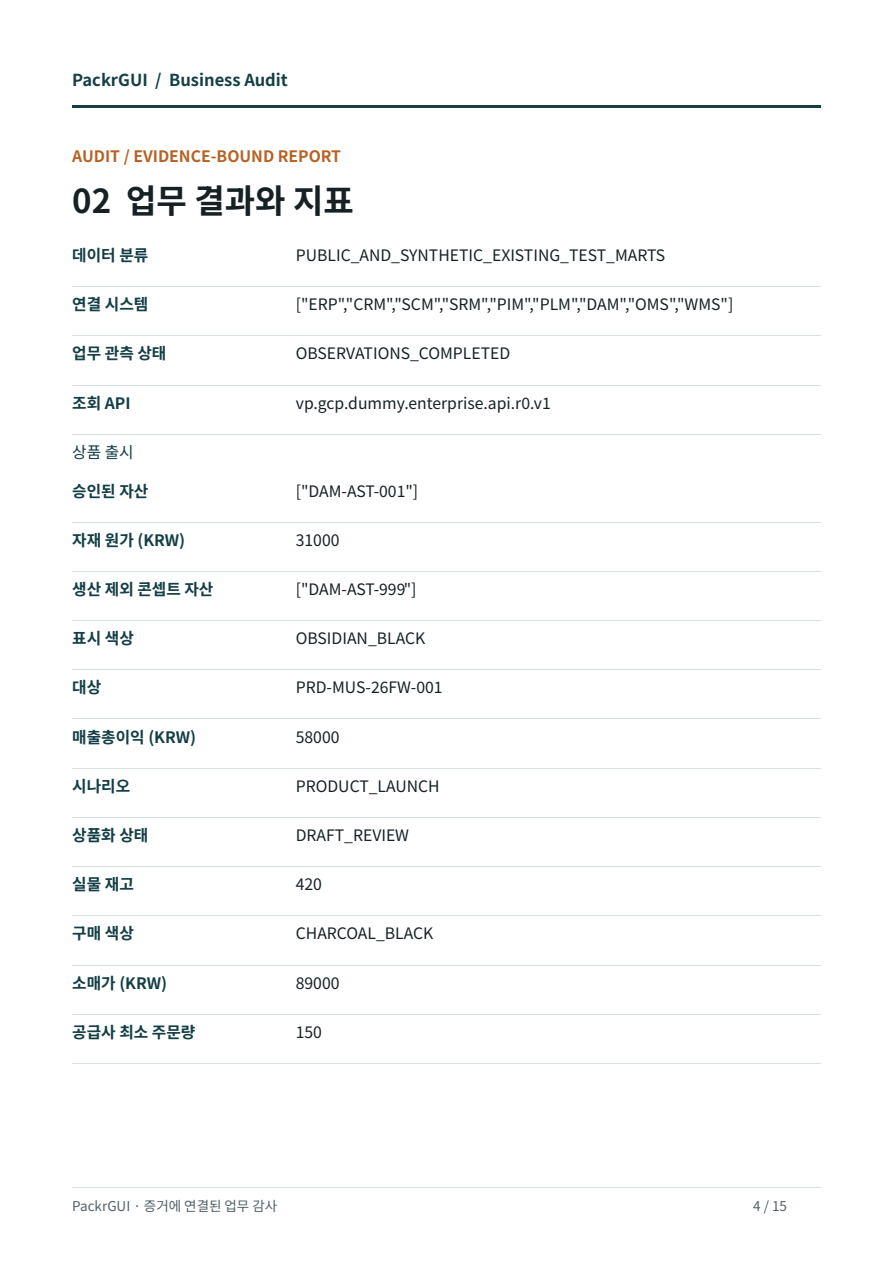
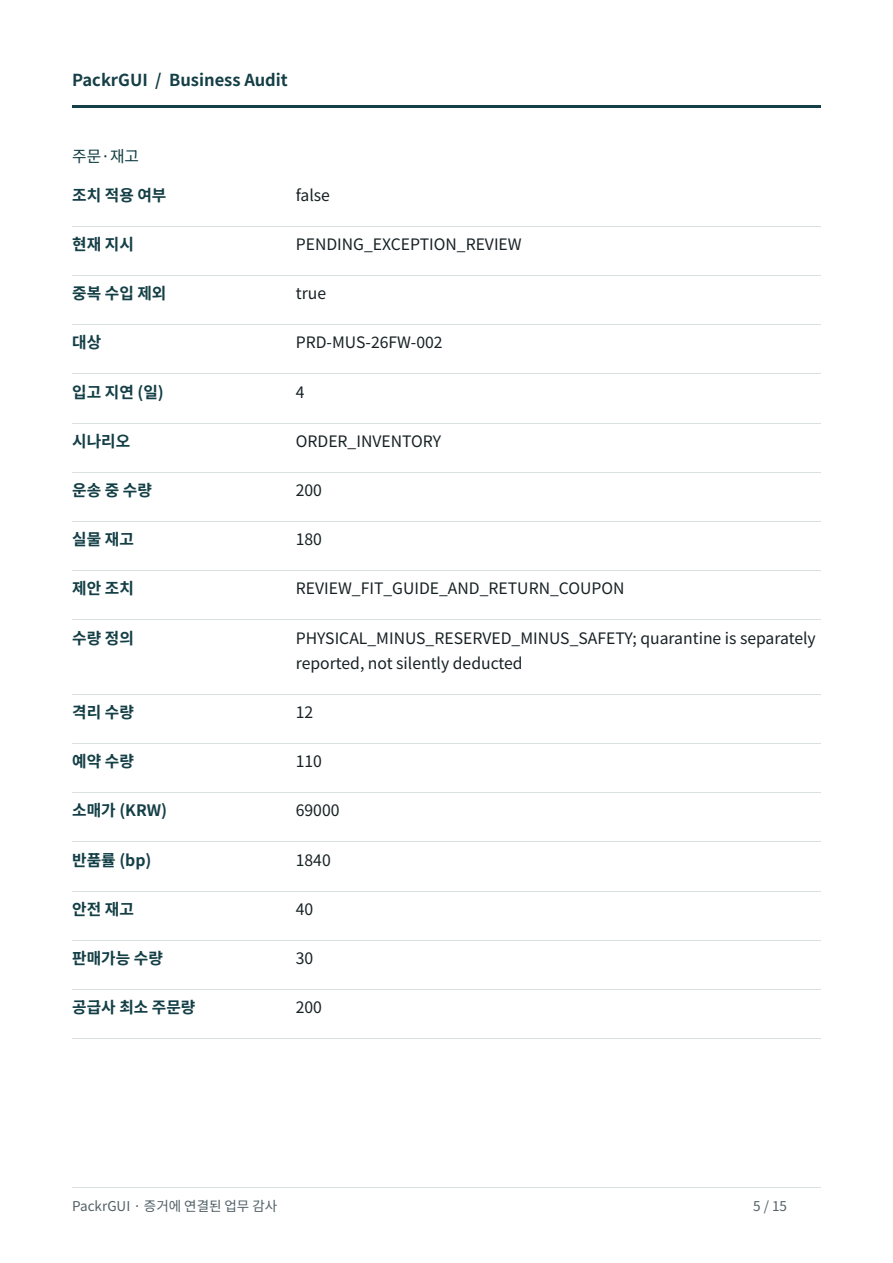
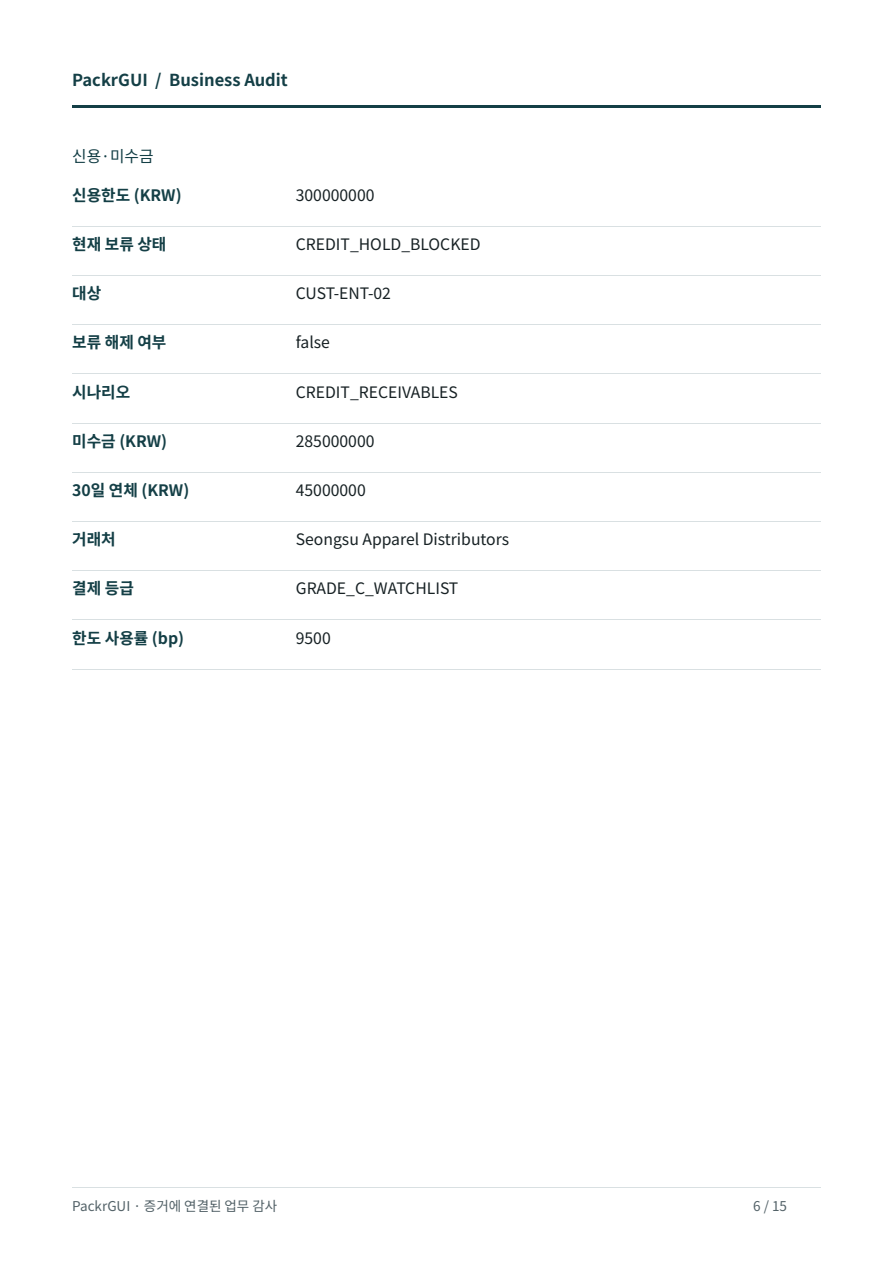
Actual English result pages from Windows and Linux
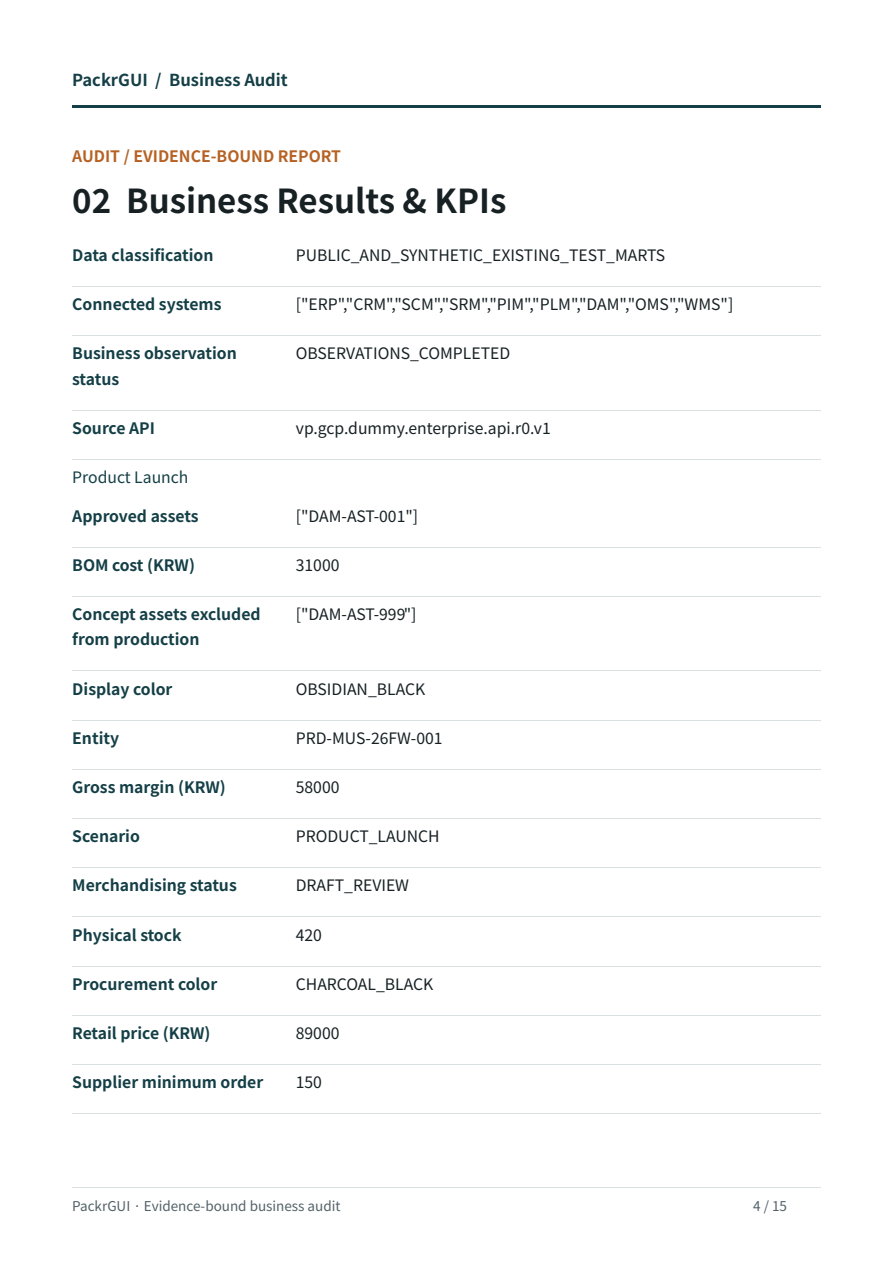
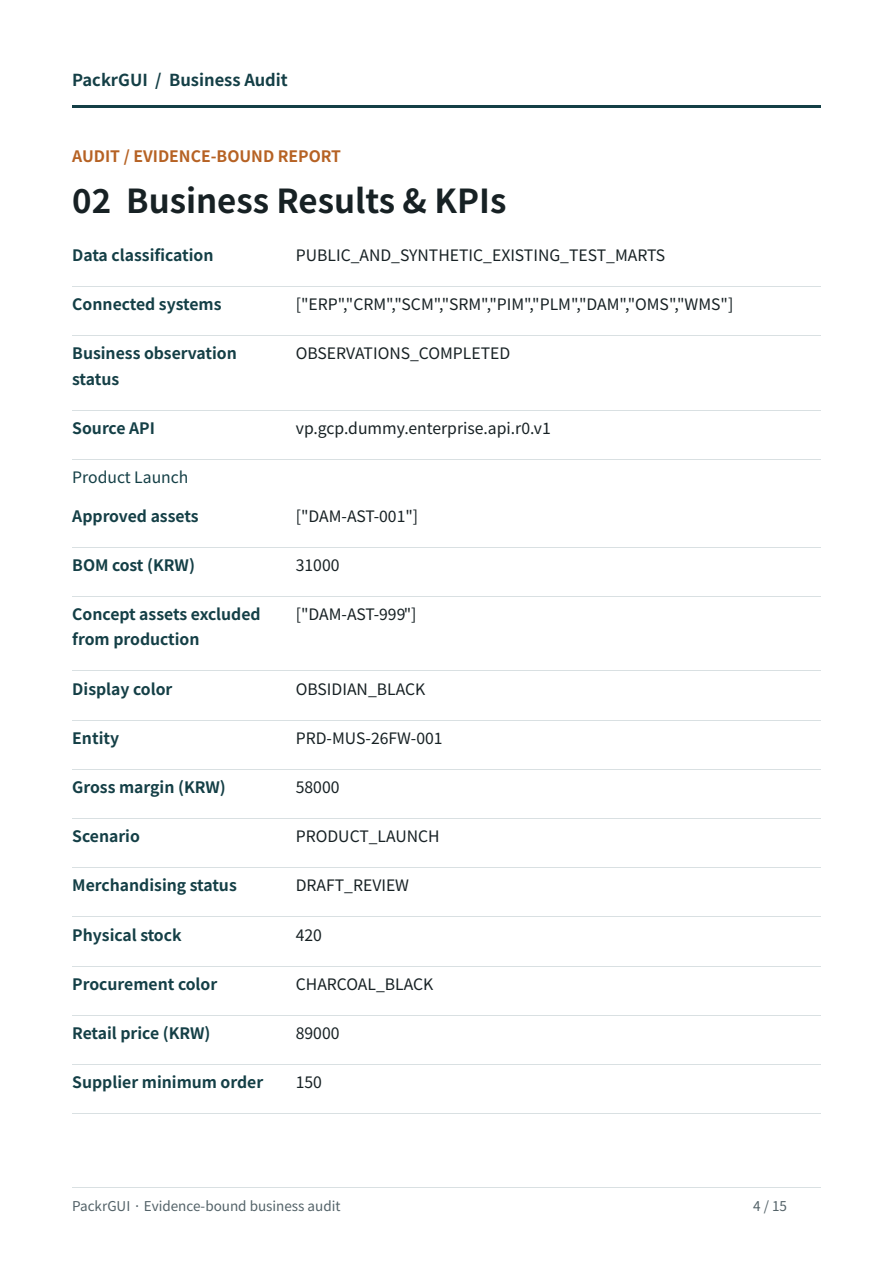
OBSERVATIONS_COMPLETED means observation and calculation finished; human acceptance is separate. Missing values are not replaced with zero or success. For STOP_WITH_FINDING, review the partial result and its reason.
Compare observed values and source links. Preserve missing-data findings, credit holds and actions that were not applied.
STEP 10
Recover, preserve results and finish
If communication drops or only PDF opening fails, inspect the existing records before rerunning business work. For a remote connection, use prepared-audit.json to retrieve the result of the same Work without executing it again.
./bin/macos-arm64/packr-enterprise-guide --bundle "$GUIDE_DIRECTORY" --remote-config "$PRIVATE_ACCESS_PROFILE" --recover-prepared "$RUN_DIRECTORY/prepared-audit.json"Use the Windows or Linux executable path from step 7 on those systems. COMPLETED means the original result was found; the Work’s acceptance state and missing-data findings remain unchanged. For a local connection, inspect the existing Headless Work list and detail.
| Keep these files | Purpose |
|---|---|
| business-observations.json · source-responses.json | Business observations, source classifications, original responses and hashes. |
| prepared-audit.json | Retrieve the original request’s result after interruption. |
| canonical-result.json · canonical-report-reference.json | Canonical Work, receipts, closure records and report reference. |
| final-report.pdf · final-report.json | Verified reports downloaded in remote mode. In local mode, use the original paths recorded in the report reference. |
| result.json or failure.json | Verified result or the first recorded failure. |
For UNKNOWN or RESERVED_INCOMPLETE, do not change a run name or key merely to resubmit the same request. Preserve results and remove only the temporary connections, processes and test credentials created for this task. Shut down only designated test VMs normally and preserve their original disks. Do not stop production servers as a group.
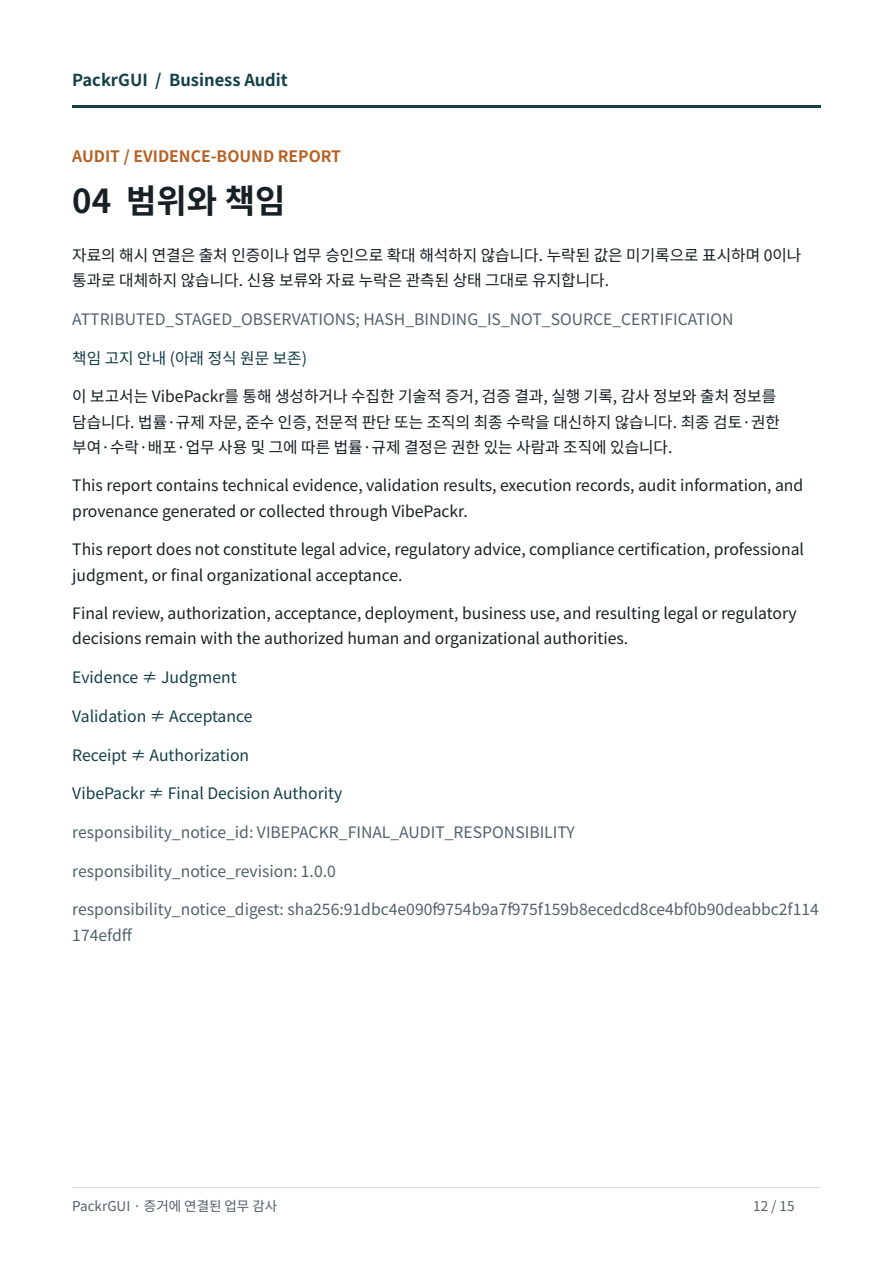
The responsible person decides final acceptance separately. This guide update made no new business execution, model call, cloud change or final acceptance.
Preserve the same Work’s results and responsibility notice, and record temporary-resource cleanup. Do not relabel pending acceptance as complete.
Verification scope of this edition
v11 adds English as the default guide language and an EN/KR switch. Verified installers, Workflow executables and report images are unchanged. The v07 documents embedded in installers remain historical copies; use this top-level guide for current instructions.
Earlier measurements cover GCP/local VM installation, installed-file comparison on three OSes, actual PackrGUI execution of nine data marts and three scenarios, 15-page A4 v3 reports and live Codex status queries. Linux GUI/Codex testing used the exact release files on debian-work; DEB installation used a separate test VM. The three OS tests did not all use one identical server binary version.
Still unverified: live Antigravity connection, a model reading Skill bodies, customer production binding, an unaided novice replay, and official signing, notarization and release. This remains a local review package.
The guide contains seven actual UI/file views (five input examples and two file views) and nine original PDF page images. Input examples are not successful execution records. The language switch changes guide text and captions; original product screenshots, report languages and file names remain intact. Image sources and SHA-256 · Previous verification scope